Nov 8, 2010

A Lesson From Emily Carr (1871-1945)

I'm in Vancouver for a visit with my daughter and today I went to the Vancouver Art Gallery to see the Emily Carr paintings. She willed 157 of her paintings to the Art Gallery in 1945 but most of them are in storage or on loan. However about 20 of them were on display today and coupled with contemporary artists who are depicting similar themes such as the First Nation village life, the forest and the symbology that comes from West Coast First Nations cultures.
Emily Carr
Young Pines and Sky, circa 1935
oil on paper
Collection of the Vancouver Art Gallery, Emily Carr Trust

 I think that no one has captured the power, feeling and mood of the magnificent ancient British Columbia forest that was still evident when Emily Carr started painting it almost 100 years ago. Yet even Emily became discouraged about her work and almost stopped painting during the 1920's. Instead, she earned her living renting out rooms, and making and selling the most god-awful looking pottery souvenirs.

 I knew that she'd made pots, but hadn't seen them until visiting the Vancouver Art Gallery today. Emily appropriated 'indian motifs' in her pots and ashtrays without really understanding the context.

The exhibition juxtaposes quilts made by BC author / artist Douglas Coupland who has stitched 'souvenir' First Nation motifs into his creations. Coupland has also imagined a dialogue between him and Emily about their work and it plays in the room where the pots and the quilts are displayed. I thought it was a clever way to talk about the appropriation of culture!

I wish I could show you photos of the exhibit, but photos are not allowed; the Vancouver Art Gallery does not have paper brochures about their exhibits; the website is also very sparse in terms of description and imagery of their exhibits.

Emily Carr, Loggers' Culls, 1935
oil on canvas
69.0 cm x 112.2 cm
Collection of the Vancouver Art Gallery.  Photo: Trevor Mills, Vancouver Art Gallery
 I've been thinking all day about this wonderful artist who set aside her brushes to create 'saleable' ashtrays and dishes. Thankfully Lawren Harris (yes, the Group of Seven Lawren Harris) invited Emily to a show in 1927 that sent her back to her oil paints.
Emily Carr, Strangled by Growth, 1931
oil on canvas
64.0 cm x 48.6 cm
Collection of the Vancouver Art Gallery. Photo: Trevor Mills, Vancouver Art Gallery
I'm thinking that Emily's period of self doubt is a very good lesson for all of us.  Rather than abandoning the art that seems 'non-commercial' and trying to make saleable items, like Emily's ashtrays, we need to follow our passions and stay on course. We must dismiss those doubts and follow our creative hearts even when (sorry for this) we can't see the forest for the trees.

Sep 1, 2010

Inspiration in a Wistful Look : monoprinting

Monoprint by Flora Doehler, 2010.

Ideas for art work are all around us. I was at a friend's house the other day and spotted this in her garbage:

Through the Eye of a Needle: stories from an Indian desert.

I fished it out and thought about what it was that drew me to the image. The photo itself looked timeless. It could have been 100 years old. The colours reminded me of the plants in my garden and the growth and passing of people. The posterization of the woman stripped away her personal details and left an impression of the person. And the expression on her face was so earnest, so sad. There is a photo of her in full colour at the end of this 2 minute video promotion for the book and DVD right here and she is definitely living in the here and now.

The photo reminded me of old family photos I have of my ancestors. I've long wanted to create a group portrait using photos of all of us at similar ages and that's a project I'd like to take on this winter.
I wondered how I could translate a photo into a mono print. I looked for photos with good contrast and found one of myself taken when I was six.


Using Adobe Photoshop Elements, I posterized the photo which turned it into this:

Elements is a less expensive version of Photoshop. I also think that it's easier to use.

Next, I printed the photo out on paper and placed it over a piece of foam. Then outlined the black edges of the portrait while pressing hard with a ball-point pen. This made an indented line in the piece of foam. I removed the paper and went over the indented line once more with my pen.
The foam parts will print out and I cut away all the parts that I wanted to remain white. I left a 1/16th of an edge of foam beside the pen line which will stay white. Then I glued the results on a piece of wood and added some precut letters and stars.
Attach the letters backwards because the resulting print will be a mirror image of the printing block.

I inked the foam and printed.


I'm pumped now to work on an ancestral portrait series thanks to that wistful discarded image that inspired me. Inspiration is everywhere.


With the next image I'll be more mindful and remember to flip my photo before I trace it so that it comes out the 'right' way.

Aug 25, 2010

Painting the Historic Gardens in Annapolis Royal

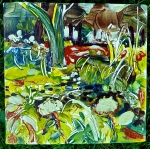
In the Begonia Garden by Flora Doehler, 2010. 8" x 8"

This past weekend I joined over 70 artists to 'Paint the Town' in Annapolis Royal. This annual fundraiser for the local Arts Council is a great opportunity for artists to show and sell their work and for collectors to watch artists at work and to buy art at reasonable prices.
The Annapolis Region Community Arts Council (ARCAC) has sponsored the event for years and the weekend runs like a well-oiled machine. Artists arrive from all over Nova Scotia...over 7o painters this year. The artists set up all over town.
Plein Air Painting kit

If you are curious about the contents of my painting kit, click on the photo and read the notes at Flickr.
Volunteer 'runners' circulate and pick up the finished pieces in pizza boxes and take them back to the gallery at the Legion where they hang for sale all day with a 'gallery' price determined by the artist. At 5 o'clock the unsold work is auctioned by silent auction. The Arts Council gets 50% of the amount and thousands of dollars are raised this way every year.

The Artist entry fee is $12.

I was thrilled to be able to set up my paints at the Annapolis Royal Historic Gardens. This park is an oasis of flower garden beds organized around the centuries of the town.
The first morning I scouted around the park with its ancient trees.


I set up in a great spot with dappled light under towering trees. The begonias were a riot of colour and were nicely contrasted by blue salvia flowers. I pulled out all my gear and promptly dropped my piece of German Plum Cake upside-down on the grass. Not to be discouraged, I brushed it off and enjoyed it with my coffee while I studied the flowers and thought about my painterly approach to them. Meanwhile birds hopped around and sang and it was wonderful to be there.

Surrounded by happy flowers.
Wonderful until I realized that I'd forgotten to bring containers for my paint water!! I finished my treat and headed for the recyling bin where I found plastic juice containers! My sharp knife soon transformed them into water jars and it was smooth sailing after that.
Here are the works I painted in the Begonia garden on Saturday. (Click on the images to enlarge them.)


The next day, Sunday,  I spent the early morning in the Victorian Garden while there was still some shade to work in.

The colours were vivid and the zinnias were taller than me. At one point a butterfly was brought out and released to much fanfare.

This was my largest painting. I used up all my matt medium on it.

My Sunday problem was that I ran out of matt medium! It's an essential part of my kit because I use it to get the scratching-in effect in my paintings. I searched out other artists in the park and was given some by artist Shannon Bell and when that ran out, a bottle of the stuff from Louise Baker, an artist with a love of colour who lives in Halifax. Thank you Louise and Shannon!!!

Here are the paintings I did in the Victorian Garden until the sun drove me away. (Click on the images to enlarge them.)
After the heat of the flowers and the sun, I decided to seek out a cool, shady, quiet spot. I found this at the Lily pad pond.


The mosquitos thought it was a pretty nice spot too, in spite of my liberal spraying of citronella. In fact a couple wandered by while I was painting and asked me if I could tell them which flower was giving off that scent. I told them that I was the flower and we had a good laugh over that.

The challenge here was to edit the elements down to make sense of the scene in a painting.
They were visiting from Montreal and I told them about the silent auction. They later lost out on the bids for 2 of my pieces, but found their way to our studio the next day where they bought 2 paintings that I had been working on in my garden. Here is one of them:

Nicotiana
Nicotiana in garden chez moi.

It was truly wonderful to connect with some of the people who bought my works. Over half of the purchasers and bidders had watched me paint in the park. They connected with my interpretation and they also connected with the setting. I think it was nice for them to see the process (well, not the dropped plum cake part). Oh, did I mention that all 12 paintings and sketches that I did over the weekend sold? It's three days later and I'm still flying high about it.
These were my paintings at the lily pond. (Click on the images to enlarge).


At the end of the day I sketched the scene for myself with marker and brush on damp paper. A charming woman from New York walked by to admire it. She thought it would make a gorgeous wallpaper. I told her that it was my souvenir of the weekend and she suggested that I offer it at the silent auction so that she could bid on it.
Well I did and it sold for $50. Here it is for you to see:

The Pond sketch on 9" x 12" watercolour paper. ( The paper is actually white)
Acrylic paint brushed into damp paper.

It was an exciting weekend on many levels - wonderful to meet painters, wonderful to have such a positive response to my work, wonderful to create in such an inspiring setting. And, wonderful to earn some money too which was just as well because our house water situation was failing while I painted.

See you next year at Paint the Town!

photo courtesy of Trish Fry, Annapolis Royal Historic Gardens.

Jun 29, 2010

Acrylic Painting Tutorial

I wanted to “show and tell” you about a recent painting of mine because it expresses the emotional connection I feel for iris.

The Yellow Surprise

There were gorgeous, large bearded irises in my grandmother’s garden over 50 years ago. My mother transplanted some to her garden and eventually I had them in my garden. They moved ½ way across the continent with us when we came to Nova Scotia and are blooming like never before.

Jun 7, 2010

Painting Iris

Bringing flowers into the studio and onto the canvas.
The lupins and iris are blooming and there is a riot of colour outside.  I wait every year for this short time - the three week window when iris are in bloom so that I can paint them. Since moving to our house in Nova Scotia a year ago, I am now blessed with hundreds of lupin that ring our garden and our yard and bloom at the very same time as the iris. I am spending each day with my brushes painting these beauties with fluid acrylics.

Apr 2, 2010

Painting the Setting Sun

One night last August, Larry drove us home through the Annapolis Valley while this sky drama unfolded. That ribbon of orange light that contrasted with the purple-indigo sky was so captivating that I'd wished I could paint it. I snapped these photos with my digital camera. (I never even go to the grocery store without it.)

While I was painting the flower bouquet, I remembered these photos and how I'd always meant to paint the scene. Only at the time, I thought I'd use watercolours. Now that I'm experimenting with oil paints, I really wanted to interpret the scene with my oil paints and oil sticks.

Fortunately, I like to work on several paintings at once. ;-)  I think it keeps my work more spontaneous and it allows time for the oils to dry. So, I set aside the bouquet painting, for now, and pulled out a brand new white canvas. It is always a total thrill to start a new piece, but nerve-wracking too.

These are the steps I took:
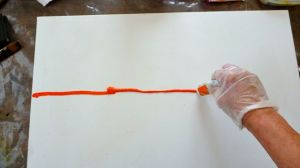
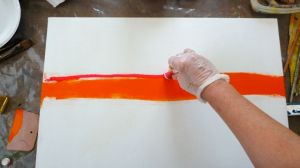
1. Squeeze out a line of orange paint.

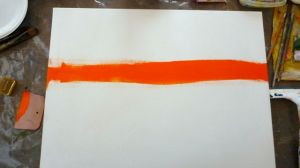
2. Drag the paint across the canvas with card or a squeegee.

I wanted to blend a pink with the orange in order to get a variation of colour in the sunset.


3.  Apply a hot pink — "Opera" from Holbein.

I don't have very many oil sticks yet, so that's why I'm using colour out of the tube.

4. Squeeze out a line of purple.

I wiped the paint into the canvas with a cotton rag (an old bed-sheet torn into a lot of pieces)! And rubbing and wiping with a cloth is a great way to blend the colours where they meet.

5. Wipe trees into the painting.


It was really difficult to cover that gorgeous orange, but then it wouldn't have been a sunset anymore, would it?

6. More trees, more paint.


You can see that I squeezed more colour out of the tube as well as using my ultramarine oil stick. Late in the game I added a line of yellow to the sunset and blended it in using q-tips.

7. I added yellow afterwards.


The actual colour of the painting is a pretty accurate in this photo. I've only been working in this studio space for a couple of weeks. I was working in the house over the winter — you can see the room through the window. It's the farthest one at the front of the house. This outside studio is much nicer because I can stomp around with my muddy garden boots. Even better, Larry works in here creating metal pieces. I'm going to tell you all about that the next time!

8. Almost there.


I'm happy with the mood I got in this painting. I think it has that mystery  and slight foreboding that I felt about the dark landscape rushing by. It's interesting how differently we perceive a night landscape verses a daytime one.

9. I 'lifted' some tree shapes in the foreground by rubbing off some of the paint.

Mar 27, 2010

Oil Painting without Brushes

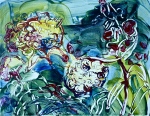
Painting Detail.
I've been working in the studio on an oil painting and using the techniques that I learned this week at Wayne Boucher's studio. So far, I've applied the paint by
  • using mostly oil sticks
  • squeezing paint out of tubes directly onto the canvas
  • moving it with rags
  • scraping it with the rubber end of a pencil
  • wiping it away with Q-tips and paper towels
  • blending it with my latex-glove covered hands

This is my progress so far.


I mostly used oil sticks, and the tubed oils I'm using are watersoluble which makes the clean-up part so easy!

I didn't like the heaviness of the pot and I wanted to introduce a variety of flower shapes, so I decide to change the painting to a vase of flowers...


I am still working on this painting, but this is what it looked like last night when the sun set. I usually stop then because I really need natural light to see.

The current incarnation of the flowers.


I like the green in the lower part of the painting. I am happy with the soft lost and found effects in the flowers in the upper left hand side of the painting.  I'd like to introduce more of that feeling in the lower part of the painting. The flowers there are too uniform...all the same size, not overlapping and facing straight on.


I'm loving the details and I'm back in the studio today to make the rest of the painting as interesting as those details. It's rather delightful to be painting with unconventional tools as well as using my hands to shape the painting. I'm stepping out into the sunshine of today to the studio to continue. It's back to the drawing board for me!
Related Posts Plugin for WordPress, Blogger...